Finding a good dashboard accessory mount for the Lexus GX460 is harder than it should be. There are plenty of ways to mount a phone, tablet, GPS or satellite communicator, but many substantial systems require drilling holes in the dashboard.
I wasn’t interested in doing that.
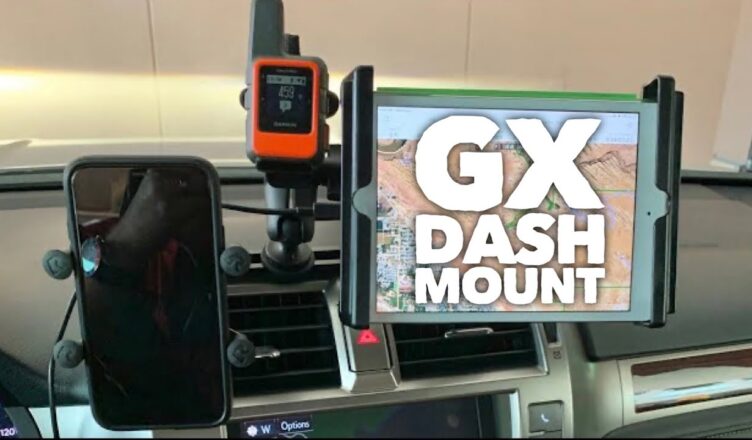
Instead, I built a simple no-drill Lexus GX460 dashboard accessory mount using inexpensive T-track, RAM Mount components and 3M automotive molding tape. It gives me a solid, modular mounting point for several devices without permanently modifying the GX dashboard. After years of use—including Texas heat and trail time—the setup has proven remarkably durable.
Why I Built My Own GX460 Dashboard Mount
I wanted one mounting system that could handle a phone, iPad or other tablet, Garmin inReach, GPS/navigation device or other RAM-compatible accessory depending on the trip. A short section of T-track across the top of the dashboard gives the RAM track balls room to slide, making it easy to add, remove or reposition devices.
The challenge was attaching the rail without drilling into the dash. That’s where the 3M automotive molding tape comes in.
Does Double-Sided Tape Really Hold?
Yes—at least with the tape I’ve used. The T-track was installed using 3M Super Strength Molding Tape (03616). By the time I filmed the original video, the mount had survived two Texas summers, trail use and the weight of an iPad, phone and Garmin inReach mounted at the same time without pulling loose.
That’s an important distinction: I’m not claiming every double-sided tape will produce the same result. My experience is specifically with this 3M automotive molding tape. Proper surface preparation matters too, so clean the dashboard thoroughly before installation and follow 3M’s application instructions.
Parts Used
- Garmin inReach Mini GPS Satellite Communicator
- 3M Super Strength Molding Tape, 03616, 7/8 in. x 15 ft.
- RAM Track Ball with T-Bolt Attachment
- RAM X-Grip Universal Phone Holder with Ball
- RAM Composite Double Socket Arm
- RAM Tab-Tite Universal Spring Loaded Holder for 8-inch Tablets with Case
- Compact wireless charging puck compatible with your phone—the ESR charger used in the original build is no longer sold.
- T-Track
How to Install the GX460 Dashboard Mount
1. Measure the dashboard
Determine how long you want the T-track to be and where you want your devices positioned.
2. Cut the T-track
Cut the rail to length. I angled the ends of mine to follow the contours of the GX dashboard. It’s a small detail, but it makes the finished installation look much more integrated.
3. Prepare the mounting surface
Thoroughly clean the dashboard mounting area with alcohol and allow it to dry. Don’t shortcut this step. Adhesive is only as good as the surface it’s attached to.
4. Apply the 3M molding tape
Apply the automotive molding tape to the underside of the T-track according to the manufacturer’s directions. The GX dashboard has a slight raised section beneath the track location, so my installation uses two separate sections of tape rather than one continuous strip.
5. Mount the T-track
Carefully position the rail and press it firmly against the dashboard to establish a strong bond. Take your time getting the position right before committing to it.
6. Install the RAM components
Slide the RAM T-bolt track balls into the rail and position them wherever you want your devices. Add the appropriate RAM arms and holders for your phone, tablet, GPS, Garmin inReach or other equipment.
Adding Wireless Charging
One of my favorite parts of this setup is something you barely notice. I mounted a small wireless charging puck inside the RAM phone holder. When the phone goes into the mount, it begins charging without a cable hanging down the front of the dashboard.
The exact charger I originally used has since been discontinued, but the concept works with other compact wireless charging pucks. Just make sure the charger is compatible with your phone and fits securely within the holder.
What I Like About This Setup
The biggest advantage is obvious: no holes in the dashboard. The T-track also gives you considerable flexibility in where accessories are positioned. RAM components can be moved, removed or swapped depending on what you’re carrying.
It’s surprisingly unobtrusive too. With the track cut to match the dashboard contours, I’ve had passengers assume it was part of the vehicle.
Most importantly, this isn’t something I installed yesterday and immediately recommended. It has dealt with Texas summer heat, multiple devices and trail use without giving me a reason to replace it.
Is It Better Than a Commercial GX460 Dash Mount?
That depends on what you want. There are purpose-built GX460 mounting systems available, and a mechanically fastened system may make more sense if you’re comfortable drilling into the dashboard, mounting substantial weight or regularly driving very rough terrain.
But if you want a simple, relatively inexpensive and modular mounting system without drilling into your GX, this approach has worked extremely well for me. Watch the video above for a closer look at the installation, including the placement of the 3M tape and how the T-track follows the contours of the dashboard.
TX:GX Overland uses affiliate links on some gear recommendations. If you purchase through one of those links, we may receive a small commission at no additional cost to you.
Check out our overland product and gear reviews. We also have many overland videos and Texas off-road and overland trail information.